15 February 2016

Tip of the month! February: Ribbons


With the new year and the imminent release of version 9 of Palette CAD, we have decided to go back to the basics and provide a little more insight into the structure of our software. This month we will look into Ribbons. Ribbons (menus) are a fast and intuitive option for working with Palette CAD.


Properties

  • Ribbons show the Palette CAD commands clearly
  • Ribbons are displayed permanently
  • Screen-tips, or explanatory texts, appear when the mouse is moved over a command
  • The graphic arrangement of the commands makes orientation easier and enhances learning
  • The ribbons are also simply referred to as menus


The menus

  • Design: Basic operations which are used frequently during designing are found here
  • Most of these operations can also be executed quickly via the context menu, the right mouse button, or via shortcuts
  • Insert: Here, architectural elements, base bodies and drawing elements can be loaded, and objects from other formats can be imported
  • The catalogues featuring objects and materials can be opened in the Design menu
  • Editing: The editing functions for objects can be found here
  • Draw: This menu is only available when Palette CAD 2D is active, and it contains the tools for drawing using 2D elements
  • Lay: This menu is only available when Tiling Technology is active, and it contains special tools for tile laying
  • Extras: This contains important commands such as Save Object and Bill of Materials
  • View: In addition to settings for the display mode windows, this area also contains the settings for rendering (the photo realistic and artistic display modes), and for switching between several open projects
  • Exposé: This is an area for results in which images from the scene can be assembled on pages for a customer presentation


Quick access to settings

  • Some menu items contain a quick access feature for configuration options
  • The settings can be accessed via the slightly hidden small arrow located below the buttons
  • There are configuration options in the menu for catalogues, editing, tools, cameras, Exposé and for the snap functions


Hiding ribbons

  • The ribbons can be hidden to create more space for the scene
  • When the ribbons are hidden, only the titles of the menus are displayed
  • The menus can be displayed and hidden again simply by double-clicking on them
  • As an alternative, you can click on the ribbon with the right mouse button and a context menu will appear
  • “Minimize ribbon” hides the ribbon 
  • Hiding the ribbons is not recommended, however, because when snapping, not all of the snap options are displayed and the display jumps 


Quick access

  • The bar for quick access is located above the menus
  • Any commands that you wish to have constantly available can be added to this bar  


Transferring a command to the quick access area directly from the menus

  • Select a button in the ribbon
  • Open the context menu of the right mouse button
  • Click on: Add to quick access toolbar
  • Now this command is present in the quick access bar


Shortcuts for ribbons


  • There are very convenient, special shortcuts for switching between menus and for quickly accessing commands
  • These shortcuts are displayed as soon as the Alt key is pressed
  • When a shortcut is pressed, the shortcuts for the commands in the ribbon it belongs to are displayed immediately
  • This means that most of the commands in the ribbons can be executed with Alt and two shortcut keystrokes
  • The commands in the quick access bar are given numbers as shortcuts  


That's ribbons all cleared up and next month we will look at some of the new updates and features in Palette CAD 9.


Greeting from Stuttgart,
Your Palette CAD Blog Team


26 January 2016

Tip of the month! January: Pitched roof


Seeing as there has been a lot of questions going around regarding pitched roofs, we decided to put the issue to bed. Yes, pitched roofs can be created automatically in Palette CAD, and below you can find out just how easy it is to do.


Creating pitched roofs automatically

  • Activate the wall's Intelligence dialog box by double-clicking on the wall
  • Or select “Wall and interior fittings” in the object controller
  • This opens the “Wall and interior fittings” dialog box
  • You can create a pitched roof in the "Pitched roof" tab
  • A pitched roof is an additional (inclined) wall which you can edit just like you would a “normal” wall
  • The height of the original wall will be reduced to the height of the knee wall
  • The pitched roof has the same name as the original wall, except that the suffix "Roof" is added to it


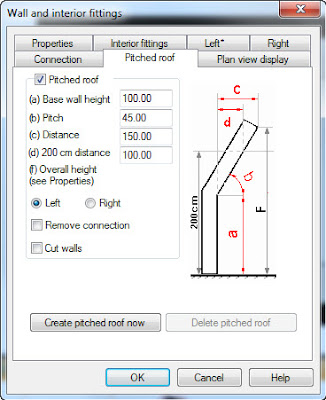
Pitched roof settings

  • Knee wall height: Height of vertical wall
  • Angle: Angle from the horizontal
  • Distance: Indicates how far into the room the pitched roof reaches (i.e., the distance from the vertical wall)
  • 200 cm distance: Distance from the wall at a height of 200 cm
  • Right/Left: Pitched roofs are generated inwards by default However, since the result is not always correct because the inward direction might not be clear, the direction can be changed
  • In the Plan View window, an arrow indicates the direction in which the pitched roof is being generated
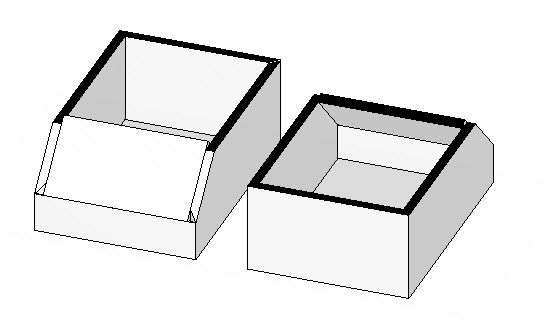
  • Remove connection: The connection to neighbouring walls is removed automatically with this option
  • The removal of the connection causes the angled mitre cut between the walls to be omitted
  • Cut walls: With this option, the two walls adjacent to the pitched roof on the left and the right are cut off at the outside edge of the pitched roof - the connection to the adjacent walls is not removed with this option
  • If further walls are to be adapted to the pitched roof, they must be cut off manually
  • This cut causes a small, empty “gusset” to be created outside in the corners of the walls


Editing pitched roofs

  • If a pitched roof needs to be wider than the knee wall (because the neighbouring walls are inclined, for instance), activate the pitched roof's Intelligence dialog box and change the length accordingly
  • Deleting a pitched roof: Activate the knee wall's (the vertical wall's) Intelligence dialog box and disable the "Pitched roof" field in the Pitched roof tab.


Placing roof windows

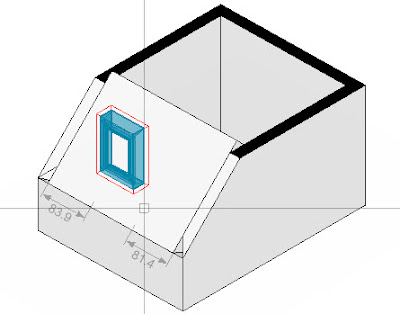
  • Windows are set in a pitched roof exactly the same way they are set in a vertical wall
  • Place the window in the Plan View or the Axonometric View above the pitched roof
  • The position of the window is indicated by the dimension arrows
  • Once the window is set, it will be automatically installed into the pitched roof
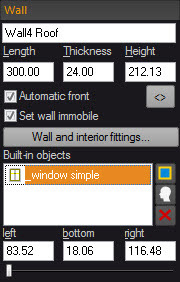
  • Positioning a window in the pitched roof: The easiest way is by using the object controller for the wall
  • Select the pitched roof
  • Select the skylight window in the object controller
  • The object controller will show input fields for the distance from the left and right and from the bottom edge


  • As an alternative, you can also use the “Interior fittings” tab in the wall’s intelligence (“Wall and interior fittings” dialog box)


There it is, doesn't get much simpler than that.


Here a little treat from Joceline, one of our user who sheared this gem in our Facebook group. Check it out for inspiration or tips from other users to get you on your way to designer super-stardom in 2016. Have fun with it!

Greeting from Stuttgart,
Your Palette CAD Blog Team


28 December 2015

Tip of the month! December: License extension

End of the year is upon us which means it's time to start think of resolutions for 2016. I almost  always fulfill mine, and am willing to share my successful technique with you. The trick is, not to rush in making them straight away at the begin of January. Instead, take your time and make sure that you are able to actually do what you set out for yourself. Then, towards the end of December, make a commitment, and keep to it for the remainder of the year. You're welcome.

Now, back to our subject, here another useful tip on how to request your license extension. You should get a reminder from the software towards the license expiration date. Of course, to start off with, you must have purchased the license extension beforehand, or be a Palette CAD update customer in order to qualify.

Next go to the file tab and select program settings. On this screen you can also find the license expiration date, should it have one that is. Next select configure hardware lock.


A new window will appear. From here there are a couple of possible ways to proceed.


If your email client allows it, simply click on request by email option. This will generate an automatic email for you which then just needs to be sent off. Otherwise you may copy the code, paste into an email and send it to us.

Apply your new code once you get it back from us and you are ready to get back to the real fun, designing dream projects with Palette CAD.


Wishing you all a phenomenal 2016,
Your Palette CAD Blog Team


16 November 2015

Tip of the month! November: Presentation settings


For many of us the days are getting shorter but work is getting longer. Just another one of the many benefits from the upcoming festive holidays. As time is in such short supply, let us try and save you a little when working with Palette CAD. At times it may take several attempts in order to get that perfect photo-realistic image or panorama. This is why it is important to learn to switch your settings between speed and quality.


The settings for presentation mode can be found under the "View" tab. At the early planning stages we strongly recommend to work with lower quality ambient light setting. Just slide the bar to "Fast".  This way it is easy to get an idea of visualisation, especially if you are trying out a number of potential materials or colours. You can also check the advanced settings and also exclude any of the options there to make it even quicker.


Of course, once the design is ready, and you are looking for that eye-catching quality, just go back into the settings and adjust the quality. Then let the results speak for themselves! Have fun.


Greeting from Stuttgart,
Your Palette CAD Blog Team


21 October 2015

Tip of the month! October: Right-click menus


We have ourselves quite a special occasion today. More than 25 years ago "Back to the future part 2" was released. For those of you that haven't seen the movie or forgot since, the time travel date is today, 21st October 2015. Feeling old yet?

With above taken into consideration this months TOTM background was easy to pick. The tip itself is also very cool, and will surely make it easier for our new users to get to grips with planning with Palette CAD. Sometimes all the tabs, menus and features can be overwhelming or difficult to find. It is exactly with this in mind that we designed these context menus. There are three possible versions.

First is a design specific menu. It is activated by pressing down on the right button of your mouse when no objects are selected (Axonometric, Plan, Front views only). General operations such Undo, Zoom or Construction Plane can be found here.


Second menu is object specific. Works exactly the same as above, but, this time, beforehand, select an object (Axonometric, Plan, Front views only). This context menu includes an extensive list of operations such as Move, Rotate and Cut.


Third menu is just for the Perspective view as the context menu focuses mainly on presentation features. It lists operations such as Walk, Camera lift and Background.


There it is, now just put the knowledge to good use and get creative. Above is my little bit of imagination brought to life. Have fun!


Happy Back to the future day,
Your Palette CAD Blog Team


2 September 2015

Tip of the month! September: Simple as that


Looking through the previous post I noticed that our posts are very specific, and suited for more active users. With that in mind, and a growing number of requests for a video demo, below is a five minute demonstration of complete design and visualisation with Palette CAD.


Tip: You can change the quality settings to 1080p for a much crisper experience!

It is important to recognise that the Palette Cad platform is far more than just a planning program. It is a complete, professional, business solution, a tool really, that can be implemented for planning, visualisation, sales, marketing, customer service and more. It is what makes us so different from many other CAD solutions. We offer a very simple,easy and affordable way to step into the ever more prominent Computer Aided Design world, while at the same time providing the possibilities to go as far and professional as your needs.


Greeting from Stuttgart,
Your Palette CAD Blog Team


14 August 2015

Tip of the month! August: Hardware and system configuration

Keeping with the current summer TOTM trend, here another short and sweet tip. This time around perhaps a little more useful for those who have just started with Palette CAD, or are trying out the demo version and wondering if their current hardware set-up can handle the heat (pun absolutely intended).

 First, start Palette CAD as always. At the start screen select "Help Topics" from the side menu.


You will now be presented with a number of options. We strongly suggest that you have a look at the top two at some point, but for now select "Check hardware and system configuration". The rest is done atomatically and you will be presented with the results in the next window that pops up.


Looks like fun, right? Well test it out yourselves and enjoy the rest of the holiday season.


Greeting from Stuttgart,
Your Palette CAD Blog Team